Soldering is integral to electronics, jewelry making, and many creative projects. However, what often goes unnoticed is the cloud of fumes that emerge every time you heat up solder and flux. These fumes aren’t just a slight annoyance—they can carry potentially harmful chemicals such as rosin, lead, and other particulates, posing health risks if inhaled regularly. Whether you’re a hobbyist or a professional, prioritizing a clean, safe workspace should start with tackling air quality, and that’s where a high-performing DIY fume extractor comes in.
In this comprehensive guide, you’ll discover how to construct your own 6.7 DIY fume extractor: an efficient, cost-effective, and customizable device that can revolutionize your work environment. With step-by-step instructions, material recommendations, and practical tips, you’ll be able to breathe easy while you solder, ensuring your workspace remains healthy and productive.
---
### Understanding Soldering Fumes and Their Risks
First, it’s important to grasp why soldering fumes are hazardous. When soldering, flux is used to clean metal surfaces and aid the solder’s flow. Heating flux and solder releases volatile organic compounds (VOCs), including formaldehyde, acrolein, and phenol, as well as metallic particulates. These substances can cause respiratory irritation, headaches, allergic reactions, or even more serious long-term health effects with chronic exposure.
Lead-based solder poses additional risks due to lead vapor, although lead-free solder options are available. Even with lead-free solder, flux fumes still contain resins and chemicals that aren’t safe to breathe. A fume extractor isn’t just about comfort; it’s about protecting yourself from unforeseen health issues.
---
### Why a DIY Fume Extractor?
While commercial fume extractors exist, they can be expensive, proprietary, or sometimes lack the customization you might desire. Building your own extractor means tailoring its size, filtration power, noise level, and placement to your workspace and workflow. It's also a rewarding project for makers and DIY enthusiasts, allowing you to learn and refine engineering skills while enhancing safety.
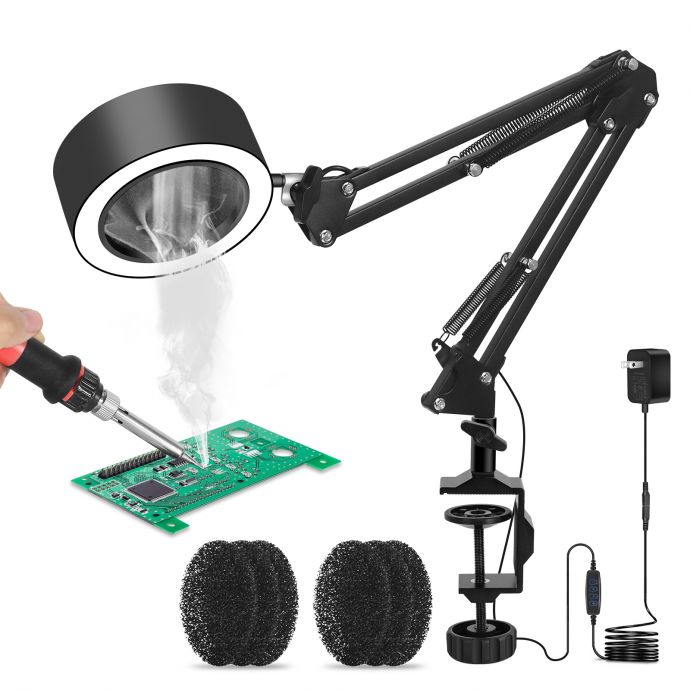
The 6.7 DIY fume extractor combines efficiency, mobility, and affordability. Designed with easily obtainable components and a straightforward build process, it's the ultimate smoke prevention solution you can rely on daily.
---
### Planning Your Fume Extractor Build
Before diving into assembly, it’s crucial to plan the extractor’s design:
- **Size**: The 6.7 extractor is sized to fit on most workbenches, with a fan diameter of 6.7 inches (about 17 cm)—balancing airflow and form factor.

- **Filtration**: HEPA and activated carbon filters are recommended for capturing particulates and neutralizing chemical fumes.
- **Airflow**: Aim for 100-250 cubic feet per minute (CFM), sufficient for most home and small shop setups.
- **Noise Level**: Select a quiet fan to avoid distractions during precision work.
- **Portability**: The extractor should be light and easy to reposition as needed.
---
### Materials and Tools Needed
**Core Materials:**
- 6.7-inch (170 mm) desktop or inline fan (DC operated, ideally with speed control)
- HEPA filter (cut to the fan diameter)
- Activated carbon filter pad (cut to size)
- Rigid housing (plastic, metal, or wood enclosure, about 8" x 8" x 3")
- Mesh grill or perforated faceplate for airflow
- Off/on switch and power supply (DC adapter or battery pack)
- Optional: LED indicator or speed control knob
**Tools:**
- Screwdrivers
- Drill and bits
- Soldering iron and solder (for wiring components)
- Hot glue gun or mounting tape
- Wire cutters and strippers
- Safety glasses and gloves
---
### Step-by-Step Assembly Guide
#### 1. Prepare the Housing
Choose a durable enclosure to house the fan and filters. Plastic project boxes, metal tins, or even custom-cut plywood can work. Ensure the enclosure allows for airflow from front to back and has enough depth for your fan and filters.
- **Cut openings**: Drill or cut a 6.7-inch round hole in the front panel for the fan.
- **Add base**: Attach rubber feet or padding underneath to prevent vibration and keep the extractor stable.
#### 2. Install the Fan
Mount the fan behind the front opening. Secure it with screws, brackets, or hot glue, depending on your enclosure’s material. The fan should face inward, pulling fumes through the filter and then expelling purified air out the back.
#### 3. Attach Filters
- **Place the HEPA filter**: Cut the filter material to fit snugly over the fan opening, ensuring no gaps. HEPA filters catch fine particulates, making them essential for soldering fumes.
- **Layer the activated carbon filter**: Place a carbon filter pad behind the HEPA filter. Activated carbon neutralizes harmful gases and odors the HEPA filter doesn’t catch.
- **Secure filters**: Hold them in place with a mesh grill, tape, or frame. The grill prevents filter material from being sucked into the fan.
#### 4. Wire Up Power and Controls
Connect the fan to its power supply. If using an internal battery pack, install it in a safe compartment. Wire the on/off switch in line with the fan and consider adding a speed control potentiometer or LED indicator.
- **Safety tip**: Always insulate exposed wires and connections. If mounting externally, use waterproof switch housings.
#### 5. Test Airflow and Filtration
Turn on the extractor and check for good airflow. Place your hand near the intake and exhaust—air should move swiftly through the filters. Adjust fan speed as needed for optimal extraction. If the airflow feels weak, check for blockages or try a higher-powered fan.
#### 6. Positioning and Usage
Place the extractor so the intake is as close as possible to your soldering area (ideally 2-6 inches away). The closer the intake, the more fumes it will capture before spreading. Make sure the exhaust vent is clear and faces away from your workspace.
---
### Enhancing Your DIY Fume Extractor
Once you’ve mastered the basic build, consider these upgrades:
- **Flexible Arm or Gooseneck Mount**: Mount your extractor to a lamp-style flexible arm for easy positioning.
- **Filter Change Notification**: Add a dust sensor or timer that signals when it’s time to replace filters.
- **Sound Dampening**: Line the interior of your enclosure with foam to reduce fan noise.
- **Remote Control**: Install a wireless switch or button for convenient operation.
- **Smart Control**: Integrate with smart home platforms for voice or automated control.
---
### Maintenance and Filter Replacement
Keeping your extractor effective requires regular maintenance:
- **Filter life**: HEPA filters typically last 6-12 months; activated carbon should be replaced every 3-6 months, depending on usage.
- **Cleaning**: Wipe down the enclosure and grill monthly to remove dust. Check the fan blades for buildup.
- **Fan lubrication**: If necessary, lubricate your fan to maintain quiet operation.
If you notice a decline in airflow or persistent odors, replace the filters promptly.
---
### Soldering with Safety: Best Practices
Even with a high-quality fume extractor, maximize safety with these habits:
- Use lead-free solder when possible.
- Keep your extractor intake close to the soldering point.
- Ventilate your workspace, especially during extended sessions.
- Wear respiratory protection if working in enclosed, poorly ventilated areas.
- Take frequent breaks to reduce exposure.
- Thoroughly wash hands after soldering, especially before eating or touching your face.
---
### Real-World Applications and Feedback
DIY fume extractors have become staples in home labs, classrooms, and maker spaces. Users report improvements in air quality, reduced headaches and eye irritation, and increased productivity. For teachers and mentors, a visible focus on safety sets a positive example for learners.
One maker shared: “Building my own fume extractor transformed my workspace. I can solder for hours without worrying about fumes, and changing the filters is easy. It’s one of the best safety upgrades I’ve made.”
---
### Troubleshooting Your DIY Extractor
Common challenges and solutions:
- **Low airflow**: Check for filter blockages or upgrade to a more powerful fan.
- **Excessive noise**: Try rubber mounting grommets, soundproofing foam, or a quieter fan model.
- **Filters not staying in place**: Ensure tight fit, add brackets or use higher-strength adhesive.
- **Odors persist**: Replace the activated carbon filter or check for gaps in filter coverage.
---
### Budget and Cost Comparison
Building your own extractor can save money compared to commercial models. Here’s a typical breakdown:
- Fan: $15–$30
- HEPA filter: $10–$20
- Carbon filter: $5–$15
- Enclosure materials: $10–$25
- Switch, wiring, and incidentals: $10–$20
**Total estimated cost**: $50–$110, depending on component quality.
Commercial fume extractors can run between $100–$300 for similar specs, and replacement filters may be proprietary, raising long-term costs.
---
### Final Thoughts
Improving air quality in your workspace isn’t just a luxury—it’s a necessity. The 6.7 DIY fume extractor offers an accessible, customizable, and effective solution for soldering smoke prevention. Building your own means you can tailor its look, power, and placement, all while gaining valuable insights into electronics and safety systems.
With proactive maintenance and thoughtful placement, you’ll be able to pursue your projects with confidence, knowing that every breath is protected. Whether you’re assembling circuit boards, crafting jewelry, or teaching others the art of soldering, this extractor ensures your workspace remains safe,