Soldering is often called both a science and an art—a fundamental skill for every electronics enthusiast, engineer, or hobbyist tinkering with printed circuit boards (PCBs). From fixing a broken wire to assembling a prototype, the quality of your soldering often marks the difference between a reliable circuit and an intermittent headache. While everyone starts somewhere, mastery in soldering surfaces when you embrace not only the fundamentals but also the right tools. One such transformative tool is the Magnetic Helping Hands Soldering Suite, a game-changer that can genuinely unleash your soldering superpowers.
## Understanding the Challenges of Soldering PCBs
Before delving into the world of magnetic helping hands, let’s briefly examine the inherent challenges of soldering on PCBs:
- **Precision:** Components are tiny, and pads can be minuscule.
- **Stability:** Soldering effectively requires absolute steadiness—any slip can bridge joints or dislodge parts.
- **Visibility:** Proper lighting and unobstructed access are essential, especially when working with densely populated boards.
- **Third-Hand Dilemma:** Most people run out of fingers when trying to hold a component, solder, and iron simultaneously.
Enter the Magnetic Helping Hands Soldering Suite—a robust, modular assistant that practically gives you a new set of hands. Let’s see how this toolset transforms your soldering workflow.
---
## What is the Magnetic Helping Hands Soldering Suite?
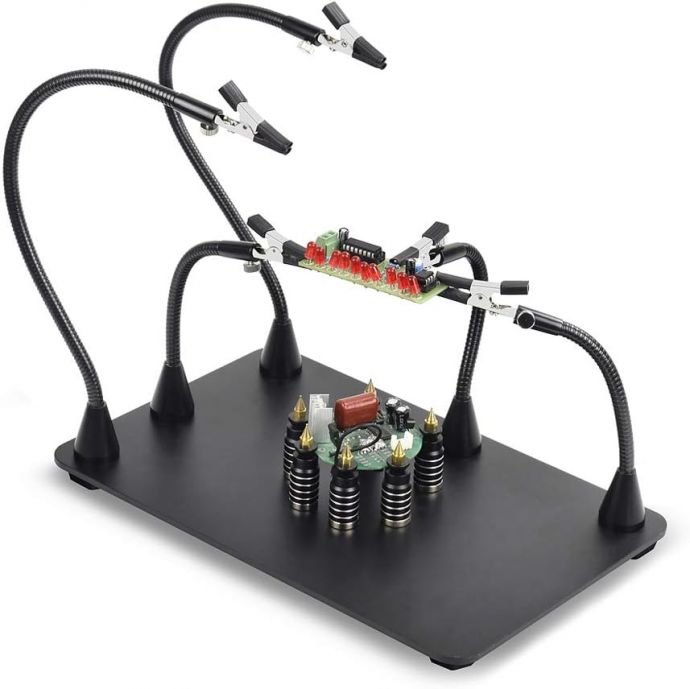
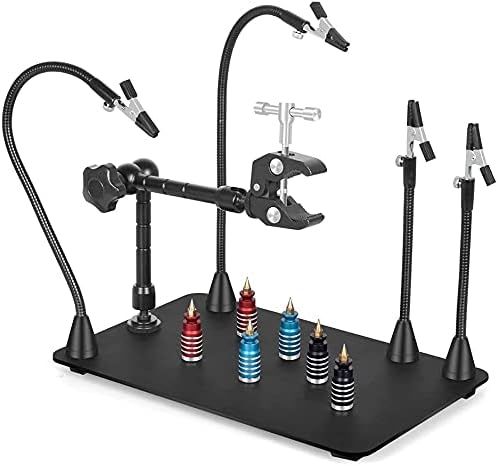
At its core, the Magnetic Helping Hands Soldering Suite is an array of adjustable arms—usually with alligator clips—mounted onto a solid, magnetized base. Unlike traditional, rigid “third hand” tools, this modern suite often features:
- Powerful neodymium magnets for sturdy attachment to metallic work surfaces.
- Flexible, articulating arms that you can position at virtually any angle.
- Swappable tips for different holding or guiding needs (alligator clips, tweezers, even magnifiers).
- Modular design to add or remove extra arms as needed.
- Sometimes, built-in lighting elements for better visibility.
It’s this flexibility and configurability that set magnetic suites apart from their old-school cousins. But how do they actually help you level up your soldering?
---
## Building a Soldering Workflow: Traditional vs. Superpowered
To appreciate the upgrade, let’s look at a typical soldering scenario:
**Traditional Approach:**
Imagine soldering a simple through-hole resistor onto a PCB. You juggle the PCB with one hand, try to hold the resistor in place with a finger, wield the soldering iron with the other hand, and somehow feed in solder. More complicated yet is fine-pitch surface mount work or situations where multiple parts must be held in place simultaneously. The end result? More mistakes, burned fingers, and frustration.
**With the Magnetic Helping Hands Soldering Suite:**
With the helping hands, you can:
1. Secure the PCB flat onto the workbench or raise it at a comfortable angle using magnetic arms.
2. Position one or more alligator clips to hold the PCB by its edges, keeping it steady without obscuring components or pads.
3. Use additional arms to hold components (like a capacitor or IC) in the right place.
4. Attach a magnifier or a small LED lamp for close-up inspection.
5. Let the articulated arms bear the burden, freeing both your hands for solder and iron.
This means greater speed, precision, and far less risk of mishaps.
---
## Key Features and Benefits
**1. Ultimate Stability**
The foundation of clean soldering is a steady workpiece. The magnetic base anchors the setup, often gripping ferromagnetic workbenches or included metal plates with astonishing force. Unlike suction-cup or weighted stands that are easily jostled, these bases can withstand the pressure of your hands or a tug on a wire without shifting.
**2. Unmatched Versatility**
Soldering is rarely a one-size-fits-all job. The ability to reconfigure the number and position of arms makes it easy to adapt to projects of all sizes:
- Swap out alligator clips for heat-resistant tweezers to grip delicate parts.
- Use dual arms to support a large, heavy PCB or a multi-layer board.
- Add an articulated magnifier for working with minuscule SMDs.
- Remove or reposition arms to avoid obstructions when working in tight spots.
**3. Enhanced Safety**
Hot irons and molten solder are a risky combination for unsteady hands. By freeing your fingers from holding components, the risk of burns or accidental movement (leading to solder bridges or tombstoned parts) is dramatically reduced. The modular arms can even create physical barriers or guides to help channel wires or keep cables away from the business end of the iron.
**4. Improved Solder Joint Quality**
When soldering is rushed or awkward, you’re more likely to end up with cold joints, bridges, or insufficiently heated pads. Stable work means:
- More even heat application.
- Better angle for the iron, ensuring full pad coverage.
- Time to focus on proper solder flow and fillet formation.
- Ability to inspect each joint closely before moving to the next.
**5. Ergonomic Comfort**
Aches and fatigue are the enemy of intricate work. Adjust your PCB’s tilt and height to minimize wrist strain. Bring components up to eye level. Use lighting and magnification to reduce eye squinting and headaches.
---
## Mastering Soldering Techniques with Helping Hands
Possessing the right tool is only half the battle. The real advantage comes from knowing how to use the Magnetic Helping Hands Soldering Suite to maximize your output. Here’s a step-by-step approach to common soldering tasks:
### Through-Hole Soldering
1. **Preparation:** Install the PCB onto the base using two or more arms. Leave the area you’ll be working on open for easy access.
2. **Component Insertion:** Use an arm and clip to hold a resistor, LED, or capacitor in its hole. For ICs, secure the body so it doesn’t shift while you work.
3. **Soldering:** With both hands free, you can precisely heat the joint and feed solder for textbook results.
4. **Inspection:** Use an added magnifier arm to check for shiny, well-rounded joints.
### Surface Mount Device (SMD) Soldering
1. **Stabilization:** Secure the PCB close to the base, minimizing bounce while using tweezers or a hot air tool.
2. **Component Placement:** Use an articulating arm with a fine-tipped tweezer or vacuum pickup to place tiny SMD chips.
3. **Tack and Solder:** Hold down the component while you tack one lead, then carefully work your way around.
4. **Error Recovery:** If a part shifts or bridges, simply reposition using the helping hands—no need to touch hot leads.
### Wire Harnessing and Jumper Soldering
1. **Cable Management:** Use multiple arms to route and pinch wires in place.
2. **Splicing:** Hold both wire tips in alligator clips, creating a stable “V” for twisting and soldering, then insulate as needed.
3. **Consistency:** Repeatable, safe, and much faster than improvising with pliers or tape.
---
## Beyond Soldering: Other Uses for Magnetic Helping Hands
Versatile by nature, these suites are invaluable not just for soldering:
- **Hot Glue Projects:** Hold small pieces for gluing or positioning until the adhesive cures.
- **Inspection and Testing:** Attach a multimeter probe to an arm for hands-free voltage or continuity checks.
- **Painting or Epoxy Work:** Secure tiny models or objects for airbrushing or fine detail work.
- **Photography or Documentation:** Hold a phone or small camera steady for close-up shots of your project during assembly.
---
## Choosing the Best Suite for Your Needs
With so many options on the market, consider these factors before making a purchase:
- **Number and Type of Arms:** Four arms is common, but modular systems can expand. Look for arms that detach or accept specialty tips.
- **Magnet Strength:** Strong, high-quality neodymium magnets grip better and last longer. Many base plates have a non-slip mat for use on glass or wood.
- **Build Quality:** All-metal arms and anodized aluminum hardware are more robust than cheap plastic imitators.
- **Accessory Support:** The ability to add magnifiers, lamps, or custom tips increases the system’s longevity and flexibility.
- **Portability:** Some suites are designed for bench use, while others can be packed and transported for field repairs.
---
## Maintenance and Care
A Magnetic Helping Hands Soldering Suite is a long-term investment. Keep it in top shape by:
- Cleaning the arms and clips regularly to remove flux residue.
- Avoiding exposure to excessive heat, which can weaken joints or melt plastic components.
- Checking magnets for dirt or chips; clean and, if necessary, replace damaged magnets to maintain holding power.
- Lubricating joints with a drop of light machine oil if articulation becomes stiff.
---
## Pro Tips: Unlocking Advanced Superpowers
To truly master your PCB projects with the suite:
- **Create a Pre-Solder Layout:** Before switching on the iron, use the arms to arrange all components and check fit.
- **Label Arms by Function:** Use colored bands to quickly spot which arm holds the PCB, component, or probe.
- **Mix and Match:** Don’t be afraid to customize your suite with specialty tips—miniature heat sinks, test lead hooks, or soft-grip jaws for fragile parts.
- **Document as You Go:** With a stable setup, it’s easy to snap progress photos or live-stream your build for tutorials or troubleshooting.
- **Store Smart:** Keep all parts together in a divided case so you can set up and tear down quickly, especially if you work in shared spaces.
---
## Conclusion: Elevate Your Craft
Soldering is a cornerstone skill for anyone serious about electronics,